Overview
(~01/2014)
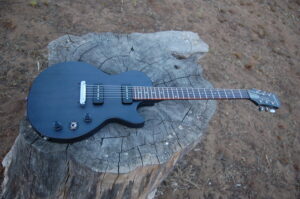
I’ve always loved the look of a LP special (typically TV yellow) something about that particular model is more down to earth than the carved top LPs. The paradox is that I could never find a used one for a reasonable price (much easier to find a worn black or goldtop). I guess the used market for these has been driven by players with similar feelings? After discovering a cheap Chinese built entry-level Epiphone model with some of the same LP bone structure my imagination was sparked.
Epiphone also makes a Korean built TV yellow special with a very close spec to the original, but what I liked about the entry model is it also shared some of the qualities of the old melody makers, thinner body, wraparound bridge, etc. as a bonus it has a bolt-on neck making the customization more like some of the basic fender clones I’ve done. With a new in box price between $80-130, This is really a no brainer.
Stock Guitar Features
- Multi-piece (3-4 pieces?) painted neck with rosewood fretboard
- Medium Jumbo frets (smaller than the SX tele’s) with what looks like ~10” radius fingerboard (have not measured)
- Solid Mahogany body with top and bottom grained laminate (maybe basswood?)
- Dual P90 pickups
- Wraparound bridge
- Single tone and volume knobs
- 3-way switch ( with similar wiring to a telecaster)
Initial Mod goals
- The neck finish/shape felt good so I’m going to leave it alone
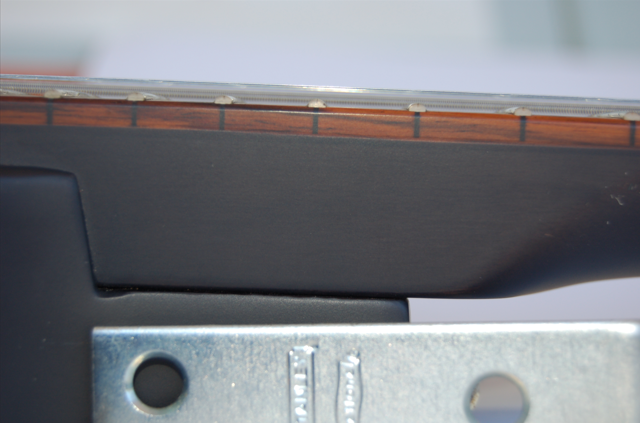
- Shim/Flatten neck angle
- Leave the 2-knob setup (LP standard 4-knob setup is too subtle for me)
- Move the switch to the standard LP position
- Add pickguard to give it a more LP Special vibe
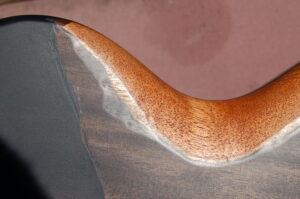
- Carve belly and maybe forearm contour to make it a guitar that begs to be played
- Refinish the body in a color that goes with the fret board (nice colorful imperfections)
Inspection/Discovery and Planning Phase
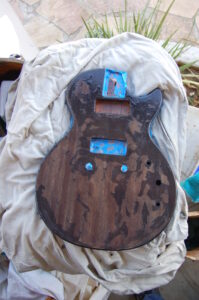
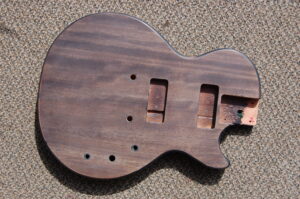
Out of the box this guitar didn’t know it was a guitar yet, if you know what I mean? Carving the belly contour revealed a good bit of information about the body construction and finish. The body is covered in a thick coating of translucent black poly urethane that can be removed with a low toxicity paint stripper. The nice thing about this material is it dissolves without removing the grain filler/sanding sealer coat below. I guess the sanding sealer is a poly where the finish coat is probably low emission water based, but didn’t need a heat gun to remove?
The sanding/sealer layer is very think and embedded deep into the grain, from experience I know that it is not worth trying to remove. The sealer/stain also is tinted grey. This will impact the final finish color.
Neck Angle
Unlike most bolt-on neck guitars, this guitar features an angled neck pocket, providing the player more of a easy playing set/glued-in type feel. While this is nice in theory, the flattop/thin body on this guitar results in a bridge that must be setup way too high for my liking. It also means the pickups are jacked way-way up giving the stock guitar a cheap look. To make this more playable as well as look better, I put in a paper shim on the front of the neck pocket allowing the bridge to be lowered right down to the deck. This feels and looks a lot better! I didn’t test before/after if it affects sustain, but I have no complaints.
If I were feeling adventurous at the time, I would have tried to carve-out/level the neck pocket since the paper wedge is a pretty cheesy fix. …It plays fine, so I have no plan to do this.
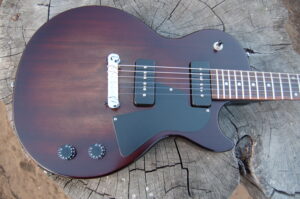
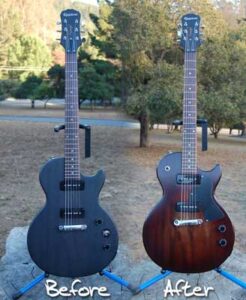
Body Finish
I toyed with a number of finish ideas but ended up trying a simple two-tone tobacco sunburst. This is actually a single finish color (Stewmac tobacco brown) over the grey sanding sealer. The final finish appears differently depending on the light conditions which I like a lot. Because I was impatient, I only used a single can of nitrocellulose finish lacquer buffed out with baking powder. Not a showroom mirror finish, but I think it gives it the feel of an older guitar. Amazing finish to me considering all the struggle doing this simple task. (material issues, static issues, dirty and windy painting environment)
Pickups
The pickup on the stock guitar are raised very high compared to a stock LP Special, which again looks pretty ugly. The other difference from the Gibson LP Special is the pickup placement. On the original LP Special the pickups are almost an inch farther apart with the bridge pickup right up against the bridge so a pre-cut LPS pickguard won’t fit. II had to cut my own.
Wiring
Moving the switch to the standard position really helps playability on this guitar especially if you play LP style guitars. I toyed with the idea of arranging the switch in an order like a Tele, because I don’t think the stock setup would work well for anyone? Drilling the body is pretty straight forward I just needed to take my time with hand tools when boring out the cavity to not penetrate the top veneer. My local electronic store had braided metals tubing which let me shield the wiring for the long the wire run, I think the guitar might even be quieter than the original wiring
After installing the switch without the plastic surround for testing, I liked the look better so I decided to leave it off.
Later Mods (~2022)
- Changed bridge pickup to Firebird/humbucker (Neil Young inspired)
- Tucked coil tap switch into back cavity
- Changed pickup covers to Nickle (Philadelphia luthier supply)
Conclusion
This model Epiphone is a great project guitar if you’re just starting to mod (Payed ~$130USD, seen them for less). Very playable, and after going back and playing a few new Gibson LP Specials, I like this one better, because it’s thin and light!